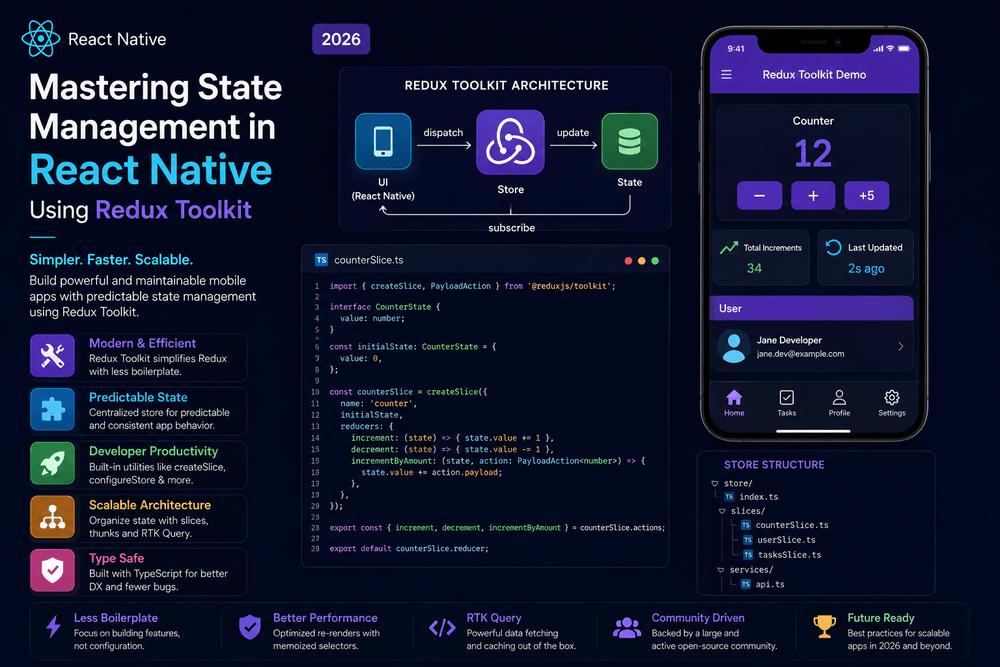
Mastering State Management in React Native Using Redux Toolkit in 2026
Building a modern React Native application involves much more than creating screens and connecting buttons. As an application grows, it begins to manage a significant amount of information: authenticated users, shopping carts, application preferences, API responses, notifications, filters, and temporary UI states.
Managing all this information inside individual components can quickly become difficult.
This is where state management in React Native becomes important.
Among the many state management solutions available today, Redux Toolkit has become one of the most practical ways to organize predictable application state. It provides modern tools that reduce much of the boilerplate traditionally associated with Redux while preserving the predictable architecture that made Redux popular.
In this guide, we will explore how to master state management in React Native using Redux Toolkit, from installation and store configuration to slices, selectors, asynchronous operations, performance considerations, and production best practices.
What Is State Management in React Native?
State is information that can change while an application is running.
For example, a shopping application may have state such as:
User
 ├── name
 ├── email
 └── authentication status

Cart
 ├── products
 ├── quantity
 └── total

UI
 ├── loading
 ├── error
 └── selected category
Some state belongs only to one component.
For example:
const [isOpen, setIsOpen] = useState(false);
This is local component state.
Other information needs to be accessed by multiple unrelated components. This is often called global or shared state.
For example, the currently authenticated user may need to be available on:
- The profile screen
- The settings screen
- The home screen
- The navigation system
- The checkout screen
Passing this information through many layers of components can become inconvenient.
A state management library provides a structured solution.
Why Use Redux Toolkit?
Redux is a predictable state container designed to help applications manage shared state.
Redux Toolkit (RTK) is the official recommended approach for writing Redux logic. The Redux documentation specifically recommends Redux Toolkit as the standard way to write modern Redux applications.
Redux Toolkit provides utilities that simplify common Redux tasks, including:
- Store configuration
- Creating reducers
- Creating actions
- Managing immutable updates
- Handling asynchronous logic
- Creating selectors
- Structuring application state
Instead of writing a large amount of repetitive Redux code, developers can use a more concise approach.
This makes Redux Toolkit particularly useful for larger React Native applications where predictable state management and maintainability are important.
Redux Toolkit vs Traditional Redux
Older Redux code often required separate files for:
- Action types
- Action creators
- Reducers
- Constants
This could result in considerable boilerplate.
Redux Toolkit simplifies this through slices.
A slice can contain:
- Initial state
- Reducers
- Actions
For example:
import { createSlice } from '@reduxjs/toolkit';

const counterSlice = createSlice({
  name: 'counter',
  initialState: {
    value: 0,
  },
  reducers: {
    increment: (state) => {
      state.value += 1;
    },
    decrement: (state) => {
      state.value -= 1;
    },
  },
});

export const {
  increment,
  decrement,
} = counterSlice.actions;

export default counterSlice.reducer;
At first glance, the code appears to directly modify the state.
However, Redux Toolkit uses Immer internally to allow this convenient syntax while producing immutable state updates.
This is one of the features that makes Redux Toolkit easier to work with than older Redux patterns.
Step 1: Install Redux Toolkit in React Native
For a React Native project, install Redux Toolkit and React Redux:
npm install @reduxjs/toolkit react-redux
Or:
yarn add @reduxjs/toolkit react-redux
Redux Toolkit provides the Redux logic, while react-redux connects Redux to React components.
The official Redux documentation recommends these packages for modern Redux development.
Step 2: Create the Redux Store
The store is the central location where your application’s Redux state is managed.
Create a file such as:
src/
└── app/
    └── store.ts
Then configure it:
import { configureStore } from '@reduxjs/toolkit';
import counterReducer from '../features/counter/counterSlice';

export const store = configureStore({
  reducer: {
    counter: counterReducer,
  },
});
configureStore() simplifies the setup of a Redux store and automatically applies several useful development defaults.
Redux Toolkit’s documentation recommends configureStore as the standard way to configure a Redux store.
Step 3: Create a Slice
A slice represents a specific section of application state.
For example:
src/
└── features/
    └── counter/
        └── counterSlice.ts
Create the slice:
import { createSlice } from '@reduxjs/toolkit';

interface CounterState {
  value: number;
}

const initialState: CounterState = {
  value: 0,
};

const counterSlice = createSlice({
  name: 'counter',
  initialState,
  reducers: {
    increment: (state) => {
      state.value += 1;
    },
    decrement: (state) => {
      state.value -= 1;
    },
    reset: (state) => {
      state.value = 0;
    },
  },
});

export const {
  increment,
  decrement,
  reset,
} = counterSlice.actions;

export default counterSlice.reducer;
This creates three actions:
incrementdecrementreset
The reducers describe how the state changes in response to those actions.
Step 4: Connect Redux to Your React Native Application
Your React Native application needs access to the Redux store.
React Redux provides the Provider component for this purpose.
For example:
import { Provider } from 'react-redux';
import { store } from './src/app/store';

export default function App() {
  return (
    <Provider store={store}>
      <MainApp />
    </Provider>
  );
}
The Provider makes the Redux store available to components below it in the React component tree.
Without the provider, components would not be able to access the Redux store through React Redux hooks.
Step 5: Read Redux State with useSelector
Once Redux is connected, components can read state using useSelector.
For example:
import { useSelector } from 'react-redux';

function CounterScreen() {
  const count = useSelector(
    (state) => state.counter.value
  );

  return (
    <Text>
      Count: {count}
    </Text>
  );
}
Whenever the selected state changes, the component can update accordingly.
Selectors are important because they allow components to request only the state they need.
Step 6: Update State with useDispatch
To update Redux state, use useDispatch.
import { Button } from 'react-native';
import { useDispatch } from 'react-redux';
import { increment } from '../features/counter/counterSlice';

function CounterScreen() {
  const dispatch = useDispatch();

  return (
    <Button
      title="Increase"
      onPress={() => dispatch(increment())}
    />
  );
}
The process is straightforward:
User interaction
       ↓
dispatch(action)
       ↓
Reducer
       ↓
Updated Redux state
       ↓
React component re-renders
This predictable flow is one of Redux’s greatest strengths.
Understanding Redux Data Flow
Redux follows a one-way data flow.
A simplified version looks like this:
Component
   ↓
Dispatch Action
   ↓
Reducer
   ↓
Store
   ↓
Updated State
   ↓
Component
This architecture makes it easier to understand how application state changes.
When an application becomes large, predictability becomes extremely valuable.
Instead of having different components modify shared information in unpredictable ways, Redux provides a clear structure for state transitions.
Managing API Requests with Redux Toolkit
Real-world applications frequently communicate with APIs.
For example:
React Native App
      ↓
REST API
      ↓
Server
      ↓
Database
Redux Toolkit provides createAsyncThunk for handling common asynchronous workflows.
A simple example:
import {
  createAsyncThunk,
  createSlice,
} from '@reduxjs/toolkit';

export const fetchUsers = createAsyncThunk(
  'users/fetchUsers',
  async () => {
    const response = await fetch(
      'https://example.com/api/users'
    );

    return response.json();
  }
);
You can then respond to the request lifecycle inside the slice:
extraReducers: (builder) => {
  builder
    .addCase(fetchUsers.pending, (state) => {
      state.loading = true;
    })
    .addCase(fetchUsers.fulfilled, (state, action) => {
      state.loading = false;
      state.users = action.payload;
    })
    .addCase(fetchUsers.rejected, (state) => {
      state.loading = false;
      state.error = true;
    });
}
This creates a useful state model:
Loading
   ↓
Success
   OR
Failure
For more advanced applications, Redux Toolkit Query can provide a more specialized approach to server-state fetching, caching, and synchronization.
Redux Toolkit Query for Server Data
One important distinction is the difference between client state and server state.
Client state might include:
- Theme preference
- Selected tab
- Shopping cart
- UI settings
Server state includes:
- API responses
- User records
- Product catalogs
- Remote notifications
- Database information
Redux Toolkit Query, commonly called RTK Query, is designed specifically to simplify data fetching and caching.
For applications that depend heavily on APIs, RTK Query can reduce the amount of manual asynchronous logic developers need to write.
Organizing a Scalable Redux Toolkit Project
A good folder structure becomes increasingly important as your application grows.
Instead of organizing files only by technical type:
actions/
reducers/
components/
screens/
a feature-based approach can be easier to maintain:
src/
├── app/
│   ├── store.ts
│   └── hooks.ts
│
├── features/
│   ├── auth/
│   │   ├── authSlice.ts
│   │   └── authSelectors.ts
│   │
│   ├── products/
│   │   ├── productsSlice.ts
│   │   └── productsApi.ts
│   │
│   └── cart/
│       ├── cartSlice.ts
│       └── cartSelectors.ts
│
├── components/
└── screens/
This approach keeps related logic together.
The official Redux style guide recommends organizing logic around features and using modern Redux patterns rather than maintaining large collections of separate action and reducer files.
TypeScript with Redux Toolkit
If you are building a serious React Native application, TypeScript is worth considering.
TypeScript can provide:
- Better autocomplete
- Safer state access
- Earlier error detection
- Clearer data models
- Easier refactoring
You can define store types:
export type RootState =
  ReturnType<typeof store.getState>;

export type AppDispatch =
  typeof store.dispatch;
Then create typed hooks for your application.
Modern React Redux documentation recommends using typed hooks to make Redux usage safer and more convenient in TypeScript projects.
Avoid Putting Everything in Redux
One of the most common Redux mistakes is treating Redux as a storage location for every piece of data.
You do not need Redux for simple local state.
For example:
const [isModalOpen, setIsModalOpen] = useState(false);
There is usually no reason to move this state into Redux if only one component needs it.
A useful rule is:
Use local state for local concerns and global state for genuinely shared concerns.
This keeps your Redux store smaller and your architecture easier to understand.
Redux Toolkit Performance Best Practices
Redux Toolkit can work efficiently, but developers should still consider application performance.
Select Only What You Need
Avoid selecting a huge object when a component only needs one property.
Keep State Serializable
Redux recommends keeping state and actions serializable because this improves predictability and development tooling.
Avoid Huge Store Objects
Do not place massive datasets into Redux unless there is a clear reason.
Normalize Complex Data
Large relational datasets can sometimes benefit from normalized state structures.
Use Memoized Selectors When Appropriate
Selectors can help derive data efficiently when computations become expensive.
Do Not Overuse Memoization
Optimization should be based on actual performance needs rather than assumptions.
Common Redux Toolkit Mistakes
Mistake 1: Using Redux for Everything
Redux is not a replacement for React’s local state.
Mistake 2: Creating Huge Slices
A single slice containing unrelated application features can become difficult to maintain.
Organize state around logical features.
Mistake 3: Ignoring Loading and Error States
Asynchronous operations should generally account for:
Idle
Loading
Success
Error
Mistake 4: Duplicating Server State
If an API response is already being managed by RTK Query, unnecessarily copying the same information into multiple Redux slices can create synchronization problems.
Mistake 5: Ignoring TypeScript
For large projects, strong typing can make Redux code significantly easier to maintain.
When Should You Use Redux Toolkit?
Redux Toolkit is particularly useful when your React Native application has:
- Multiple screens sharing data
- Complex state transitions
- Authentication state
- Shopping cart functionality
- Large application workflows
- Many interconnected features
- Significant server data
- A development team that benefits from predictable state architecture
For very small applications, Redux may be unnecessary.
A simple application with a few screens might work perfectly well using React’s built-in state and context mechanisms.
The goal is not to use the most powerful tool available.
The goal is to use the simplest architecture that remains maintainable as your application grows.
Redux Toolkit vs Context API
React Context and Redux Toolkit solve related but different problems.
Context can be useful for relatively stable shared values such as:
- Theme
- Language
- Authentication context
- Application configuration
Redux Toolkit becomes more attractive when state transitions become complex and many parts of the application need to interact with the same state.
A simple comparison:
| Feature | Context API | Redux Toolkit |
|---|---|---|
| Setup | Very simple | More structured |
| Small apps | Excellent | Sometimes unnecessary |
| Complex state | Can become difficult | Excellent |
| DevTools | Limited | Strong |
| Middleware | Limited | Extensive ecosystem |
| Async workflows | Manual | Strong tooling |
| Large applications | Depends on architecture | Excellent |
There is no requirement to choose only one.
Some applications use Context for specific concerns and Redux Toolkit for more complex global state.
A Practical React Native Redux Architecture
A mature application might look like:
React Native UI
      ↓
Typed Hooks
      ↓
Redux Toolkit
      ↓
 ┌───────────────┐
 │ Auth Slice    │
 │ Cart Slice    │
 │ UI Slice      │
 │ Product Data  │
 └───────────────┘
      ↓
API / RTK Query
      ↓
Backend Services
This architecture creates a clear separation between presentation, application state, and remote data.
The exact structure should always be adapted to the project’s requirements.
Final Thoughts
Mastering state management in React Native using Redux Toolkit is less about memorizing Redux APIs and more about understanding how application state should be structured.
Start with the fundamentals:
- Create a Redux store.
- Organize state into slices.
- Use
useSelectorto read state. - Use
useDispatchto update state. - Handle asynchronous operations carefully.
- Consider RTK Query for server-state management.
- Keep local state local.
- Use TypeScript for larger projects.
- Keep Redux state predictable and serializable.
- Optimize only when there is a measurable reason.
Redux Toolkit makes modern Redux considerably more approachable by reducing boilerplate and providing official tools for common application-development problems.
For a small React Native application, Redux Toolkit may be more architecture than you need. But as an application grows, a predictable state-management strategy can make the difference between a codebase that remains easy to understand and one that becomes increasingly difficult to maintain.
The best approach is to start simple, identify genuinely shared state, and introduce Redux Toolkit where it provides real value.
With a well-designed store, feature-based organization, typed hooks, appropriate selectors, and sensible separation between client and server state, Redux Toolkit can provide a strong foundation for building scalable React Native applications in 2026.
Frequently Asked Questions
Is Redux Toolkit good for React Native?
Yes. Redux Toolkit is the official recommended approach for modern Redux applications and works well with React Native projects that require structured global state management.
Is Redux Toolkit better than traditional Redux?
Redux Toolkit is the recommended modern approach because it simplifies store configuration, reducer creation, immutable updates, and common Redux development patterns.
Do I need Redux Toolkit for every React Native app?
No. Small applications may work perfectly well with React’s local state and Context. Redux Toolkit becomes more valuable as shared state and application complexity increase.
Should I use Redux Toolkit with TypeScript?
For medium and large React Native applications, TypeScript can provide significant benefits through stronger typing, autocomplete, and safer refactoring.
What is RTK Query?
RTK Query is a data-fetching and caching tool included with Redux Toolkit. It is designed to simplify server-state management, API requests, caching, and synchronization.
Can Redux Toolkit improve React Native performance?
Redux Toolkit is primarily a state-management solution rather than a direct performance optimization tool. However, well-structured state, efficient selectors, and avoiding unnecessary updates can contribute to a more maintainable and responsive application.
Trusted Sources
- Redux Official Documentation: https://redux.js.org/
- Redux Toolkit Official Documentation: https://redux-toolkit.js.org/
- Redux Toolkit Quick Start: https://redux.js.org/tutorials/quick-start
- React Redux Documentation: https://react-redux.js.org/
- Redux Style Guide: https://redux.js.org/style-guide/
- RTK Query Documentation: https://redux-toolkit.js.org/rtk-query/overview
- React Native Official Documentation: https://reactnative.dev/
About The Author